
This post is adapted from a blog, that I consider the supreme authority for FBA configuration, written by Chris Coulson,
Read the supreme authority here for 2016 and here for 2013
2010 – See the 2013 steps, make sure the 2010 web app uses claims based authentication, then after that everything is the same, you can’t use a classic web application.
Note: With this method, you do not need to modify the web.config of central admin or of any of the web applications, present or future. You only need to modify the machine.config and the web.config of the SecurityTokenServiceApplication web services.
So; this is the preferred method. There are other methods out there that have you modify central admin’s web.config, the web.config of each web application, and the security token service application web.config; but, who want’s to go to all that trouble. And have to repeat for every new web application, no less. I’m lazy and I would rather have the FBA be a possibility on every future and present web application. I also get really sketchy when I think about modifying the central admin web.config; so, that’s why the method that is spelled out in detail, on Chris Coulson’s blog, is optimal.
Hi-level steps
- Create the database by running aspnet_regsql.exe found at c:\windows\Microsoft.NET\Framework64\v4.0.30319\
- Make backups of any files that you are about to modify, e.g. the machine.config, the web.config of the SecurityTokenServiceApplication
- Make the edits, paying close attention to the sections that you are in. Make sure, when modifying the membership provider section, and the role provider section, that you do not modify the profile provider section
- Update the Auth Provider of the web application
- Install the appropriate FBAPack solution for ease of user management
- 2016 – https://www.visigo.com/products/sharepoint-fba-pack/download/
- 2013 – go to the visigo site for the latest stable version of this free download
- 2010 – go to the visigo site for the latest stable version of this free download
- Login with windows creds and add an FBA user, then test that the various menu’s work, and that you can login with the FBA user
More Detailed Steps
Create the database by running aspnet_regsql.exe
- Login to your SharePoint Server
- Navigate to c:\windows\Microsoft.NET\Framework64\v4.0.30319\
- Run aspnet_reqsql.exe as an administrator

- After the ASP.NET SQL setup wizard opens, read the info and then click Next, like a boss!

- On the Select a Setup Option screen, use the default selection of “Configure SQL Server for application services” and click Next, again click it like a boss!

- On the “Select the Server and Database” screen, enter in the Alias for your SQL server, or the SQL Server name if god forbid you didn’t use an alias when you set up the farm, and
- accept the <default> database name. If you change the database name, make sure that you update the name in the entry to the machine.config connection string in the upcoming steps. This post assumes you left the <default> name as shown in the next screen shot. Leaving the default name creates a database named aspnetdb.
- Click Next

Notice: The example above left the default name and used the SQL Alias <- that last sentence was spoken in “SharePoint Nerd” and translated it means “I used a SQL Alias and the database is portable”
After clicking next, the following screen appears and you should click next if you’re OK with the info. It doesn’t hurt to read it, since if there is a typo this is your chance to change it.
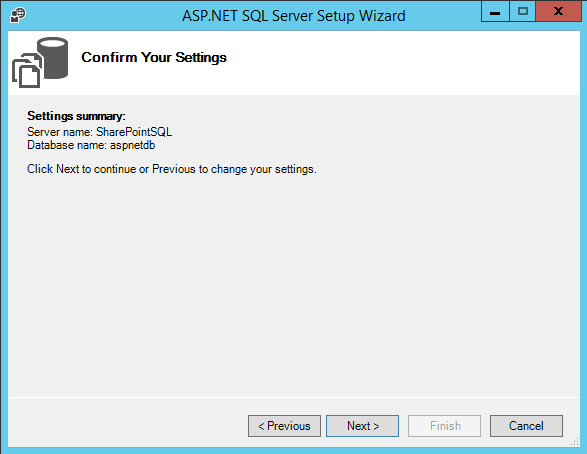
Then, on the next screen click Finish.

- Login to your SQL server
- Open the SQL Server Management Studio (SSMS.exe) and give your SharePoint Farm account, the service account that runs the shared services and search application pool, and the web content or site application pool service account(s) db_owner on the aspnetdb.
Note: if you recieve some sort of error about not being able to connect to the SQL server instance, make sure that the services for SQL server and SQL server agent are started. Don’t worry about the SQL Server Browser
- Click the security folder to expand it
- Click logins folder to expand it
- Right click the user account(s) running the security token service application pool (you can determine this from inetmgr.exe on your SharePoint server)
- click properties
- click User Mapping
- Select the aspnetdb in the Users mapped to this login window
- Assign the dbo in the Database role membership for: whichever account you’re working with
- click Ok
Make backups of any files that you are about to modify, e.g. the machine.config, the web.config of the SecurityTokenServiceApplication
- Navigate to C:\Windows\Microsoft.Net\Framework64\v4.0.30319\Config
- take a backup of the machine.config and save it with a .bak extension
- Edit the machine.config
- Scroll to the <ConnectionStrings>

The connection strings section will look like the image above
- add the following code to it
<add connectionString="Server=SharePointSQL;Database=aspnetdb;Integrated Security=true" name="FBADB" />
Note: you may need to modify the name of the SQL Server from the Alias that I was using. You might not have an alias in place and you can determine that by looking at cliconfg.exe. Make sure that the line of code that reads “Server=SharePointSQL….is updated for whatever your servername is, or preferably your alias (e.g. “Server=SPAlias….or “Server=MDCP15SQL… or whatever)
After the connection strings is updated it will look something like this:

Find the <membership> < providers> section, it will look like this
Note: You’ll be adding a section to the <membership> <providers> and to the <Role> <Providers> not the profile providers

Make sure to update the correct sections
- Add this to the Membership providers
<add name="FBAMembershipProvider"
 type="System.Web.Security.SqlMembershipProvider, System.Web, Version=4.0.0.0, Culture=neutral, PublicKeyToken=b03f5f7f11d50a3a"
 connectionStringName="FBADB"
 enablePasswordRetrieval="false"
 enablePasswordReset="true"
 requiresQuestionAndAnswer="false"
 applicationName="/"
 requiresUniqueEmail="true"
 passwordFormat="Hashed"
 maxInvalidPasswordAttempts="5"
 minRequiredPasswordLength="7"
 minRequiredNonalphanumericCharacters="1"
 passwordAttemptWindow="10"
 passwordStrengthRegularExpression="" />
- Now Add this to the Role Providers
<add name="FBARoleProvider" connectionStringName="FBADB" applicationName="/"
 type="System.Web.Security.SqlRoleProvider, System.Web, Version=4.0.0.0, Culture=neutral, PublicKeyToken=b03f5f7f11d50a3a" />
The finished product should look like this

Notice how the edits were not made to the Profile Providers. Watch out for that, it’s easy to miss.
Now Open the Security Token Service App web.config
- Open IIS manager (inetmgr.exe)
- Expand sites
- Expand SharePoint web services
- right click on SecurityTokenServiceApplication
- click Explore
- Take a copy of the web.config as a backup and save it with a .bak extension

- Add the following right above the very last closing configuration tag </configuration>
<system.web>
 <membership>
 <providers>
 <add name="FBAMembershipProvider"
 type="System.Web.Security.SqlMembershipProvider, System.Web, Version=4.0.0.0, Culture=neutral, PublicKeyToken=b03f5f7f11d50a3a"
 connectionStringName="FBADB"
 enablePasswordRetrieval="false"
 enablePasswordReset="true"
 requiresQuestionAndAnswer="false"
 applicationName="/"
 requiresUniqueEmail="true"
 passwordFormat="Hashed"
 maxInvalidPasswordAttempts="5"
 minRequiredPasswordLength="7"
 minRequiredNonalphanumericCharacters="1"
 passwordAttemptWindow="10"
 passwordStrengthRegularExpression="" />
 </providers>
 </membership>
<roleManager>
 <providers>
 <add name="FBARoleProvider" connectionStringName="FBADB" applicationName="/"
 type="System.Web.Security.SqlRoleProvider, System.Web, Version=4.0.0.0, Culture=neutral, PublicKeyToken=b03f5f7f11d50a3a" />
 </providers>
 </roleManager>
 </system.web>
When you’re done it should look like this, only it will not have the yellow stain on it.

Ok, now you’re ready to make SharePoint work with these changes, Make sure you make them on all servers in the farm if you have more than one SharePoint server. Not needed on SQL. Open Central administration just to make sure you haven’t annihilated your farm. Open a few site collections that are in the web application that will get the FBA applied.
You could reset IIS for good measure, but it really shouldn’t be needed, as changes to these files causes that to happen automatically, or at least it should.
Update the Auth Provider of the web application
- Open Central admin and navigate to manage web applications
- If not extending the web application to another zone, and using dual authentication, then select the web application and click on authentication providers from the ribbon. Else, extend the web application, then on the extended zone set the FBA.
To set the FBA perform the following:
- Go to Manage Web Applications
- Select the Web application where you want to configure Forms Based Authentication
- Click on Authentication Providers
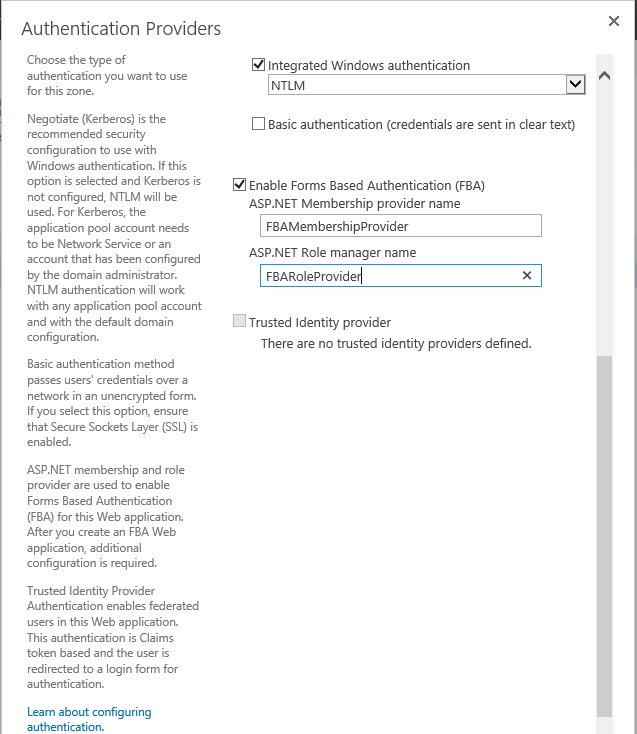
- Select the Zone that you want to configure, in this example, we’re setting up dual authentication (Windows Integrated and FBA)

Once the zone configuration screen opens,
- scroll down to the section related to FBA and add the names that you used in the membership provider and role provider sections of the .config file changes. If you didn’t modify the names of the Membership and Role Providers in the code sections that read <add name=”FBAMembershipProvider”….and <add name=”FBARoleProvider….. then you can use these names, else use whatever you changed them too.

- You’re going to check the box named Enable Forms Based Authentication (FBA) and then input the names you used

- Click Save to save the changes
Now if you try to open a web application or site collection, you’re going to get the default Sign in prompt for FBA, it will allow you to choose between Windows Integrated or Forms Based Authentication
You still cant use FBA though, even if you select it and try to use it, because there aren’t any FBA users in the aspnetdb at this time. The FBA Pack will allow you to add users to the database. The 2013 post on Chris Coulson’s blog for 2013 SharePoint explains another method.
FBA Pack Solution
The FBA Pack Solution will allow you to add and manage users
Download the solution and deploy it to your SharePoint Server. It comes with a really awesome deployment script that allows you to target one web application or the entire farm.
After you save the solution, in c:\deploy for example, then open an administrative SharePoint management shell and execute it as shown below, if you want it deployed to the entire farm

If you want it deployed to a specific web application then instead of typing .\deploy.ps1 you would type .\deploy.ps1 http://urlToThatSpecificWebApplication.Domain.com where domain.com is your domain and top level domain suffix (e.g. sharepoint.local, springfield.local, bdbsa.org, ssa.gov, or spt.local, or whatevs)
Please let me know in the comments section if there’s anything on here that could be made clearer and have fun!
Cheers!

You must be logged in to post a comment.